1. General information
This workshop is to show you the correct way of packing your sand samples safely. In fact, there is no way to gain absolute safety. But if you consider a few basics in packing, your sands will arrive undamaged and complete. We do this kind of packing for several years without one single loss of sand or damage to one of the containers. We thought this could be of help for people new to the trading scene.
2. Use of film cans
This Chapter shall give you some advice if you are using film cans as primary containers for your swap sands
(use of other containers is described in chapter 3).
All you need is a sheet of sealed air wrap, packing tape and a pair of scissors.
|
 2.1. The art of locating 2.1. The art of locating
This very first step is the most important. The kind of how you arrange the film cans on the wrap is essential for the outcome! We would recommend to use identical film cans for each package so that you can pull them together as tightly as possible. Depending on the number of film cans you are packing, we have good experience with arranging every row in an opposite direction. This guarantees that there is no space between the film cans. Check for leaks and possible flaws before you fill. A clean airtight seal is priceless. Remember to tape seal the edge of each canister for extra unexpected openings while in transit.
Film cans arranged (in opposite direction) on the sealed air wrap.
|
 2.2. Wrapping 2.2. Wrapping
Now, wrapping should be easy. Just pull the wrap tight and fix it with a piece of tape. Should look like this:
|
|
 Then, fold the left and right projections of the wrap. The secret is, to also tape them tight. Slowly it is going to get a shape. Then, fold the left and right projections of the wrap. The secret is, to also tape them tight. Slowly it is going to get a shape.
|
 2.3. Taping 2.3. Taping
I have stressed the word tight and I will continue to! Now tape the wrapped film containers tightly the way showed right here. Look how the wrap is being compressed by the tape.
|
|
 Criss-cross and compress the tape firmly around the wrap. Criss-cross and compress the tape firmly around the wrap.
|
|
 and if you have followed the previous steps you should now have something in front of you that looks pretty much like this (No! No drugs inside! But still not quite ready): and if you have followed the previous steps you should now have something in front of you that looks pretty much like this (No! No drugs inside! But still not quite ready):
This kind of packing makes the film cans being pressed firmly together. So, the caps won't pop even if not tape sealed. And the plastic cans won't be damaged either even by postmen who cannot deal with their excess power.
|
 3. Use of plastic baggies 3. Use of plastic baggies
This Chapter shall give you some advice if you are using plastic baggies as primary containers for your swap sands (use of other containers is described in chapter 2). All you need is plastic (zip-lock) baggies, packing or scotch tape and a pair of scissors.
|
 3.1. Simple packing 3.1. Simple packing
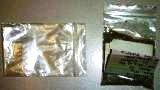
Pour the sand - normally you will use the equivalent of a 35-mm-film can quantity - into one of the zip-lock baggies. It is not recommended to use other than zip-lock bags as you will have enormous difficulties to seal them properly. Label the baggies or write respective information on a slip which you add to the sample. Plastic (zip-lock) bag filled with sand, slip with sand info and "security envelope" ...
|
 3.2. Sealing (method I) 3.2. Sealing (method I)
Fold the sand-filled baggies so that it fits into the second baggies which I term "security envelope". Ensure there is little to none air in both of the baggies. This is very important! A baggies with (much) air inside may pop up or tear if exposed to pressure i.e. careless postmen can cause. "Security enveloped" plastic (zip-lock) bag filled with sand ...
|
 3.3. Sealing (method II) 3.3. Sealing (method II)
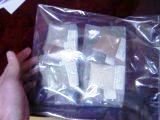
You may consider this method more effective or cheaper in costs. Just fill more sand-filled baggies into one larger zip-lock bag just as shown right below. Also, it is essential to release as much air as possible before closing the baggies for the reason mentioned in chapter 3.2. "Security-enveloped" and labelled plastic (zip-lock) baggies filled with sand ...
|
 3.4. Additional sealing of special treasures 3.4. Additional sealing of special treasures
Look at this. Be aware that plastic baggies are easy to harm. So, if you like, you can double-seal them. Just for the overcautious or those who like to add a little surplus safety ("Double-security-enveloped").
|
 3.5. Taping 3.5. Taping
Finally, fold the bag to a most compact unit and tape it firmly so that the baggies inside cannot move. They should not shake around and feel solid.
|
 4. Final packing 4. Final packing
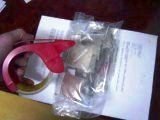
Now the sand package is ready to be enveloped. Don't forget to add a message, a list of the sand samples, a postcard, simply some neatness you would like to provide your trading-buddy with.
|
|
 Close the envelope and make sure that neither open bags remain by taping the edges. Done! Look at the tapes covering the edges of the envelope. Close the envelope and make sure that neither open bags remain by taping the edges. Done! Look at the tapes covering the edges of the envelope.
|
 5. Labelling 5. Labelling
Finally, label the parcel or letter with the required delivery information. I suppose, you won't need any assistance with that.
This makes postmen smile ...
|
6. Customs Info
There are two more important subjects to be considered:
 6.1. Mineral samples — no value (really no value?) 6.1. Mineral samples — no value (really no value?)
Don't forget to give information concerning the parcel's content and value as well, especially if the package's destination is abroad.
Some authorities might otherwise demand import taxes or customs duties. This is an example:
|
 6.2. Ready to go to any place of the world 6.2. Ready to go to any place of the world
You have to add a customs declaration (commonly known as CN-22) i.e. like the one green label on the left side of the parcel shown right below if your sand is leaving the territory of the political trading zone you are resident in. If you refuse to do so, your parcel might not be delivered to your trading-buddy. You can call yourself lucky if you will get it back; worst case it is going to be destroyed.
|
|

A different customs declaration.
|